Dive into the enchanting world of spiral herb gardens, where the beauty of nature’s patterns meets practical gardening. This space-efficient, visually appealing garden design not only maximizes your growing area but also creates unique microclimates for a diverse array of herbs. In this detailed guide, we’ll not only walk you through the steps of constructing your own spiral herb garden but also advise on the best herbs to plant according to their sunlight and moisture needs, aligned with the garden’s orientation.
I. The Essence of Spiral Herb Gardens:
- Design and Functionality:
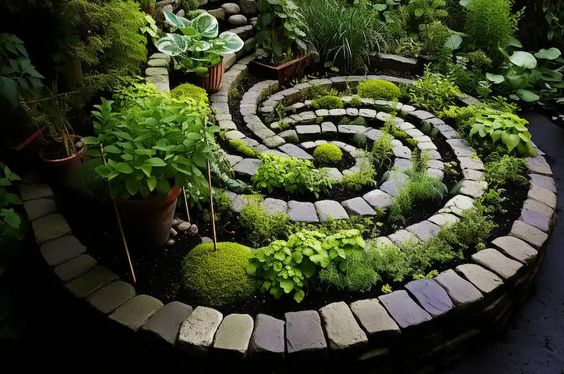
Drawing inspiration from the Fibonacci sequence, the spiral herb garden is a testament to nature’s inherent beauty and practicality. It offers varied microclimates and a vertical design for space efficiency and ease of access. - Space Efficiency and Accessibility:
The spiral’s compact structure is perfect for small spaces and minimizes the need for bending or stretching, making every herb easily reachable.
II. Benefits of a Spiral Herb Garden:
- Diverse Microclimates:
The unique shape of the spiral creates different levels of moisture and sun exposure, accommodating a wide range of herbs within a single structure. - Improved Drainage and Soil Health:
The elevated center ensures excellent drainage and fosters a healthy root environment. - Aesthetic Appeal and Habitat Creation:
The garden is not only a visual delight but also attracts beneficial insects and pollinators, promoting biodiversity.
III. Crafting Your Spiral Herb Garden:
Materials Needed:
- Stones, bricks, or retaining wall blocks
- Garden soil and compost
- Mulch (straw, bark, or gravel)
- A variety of herb plants or seeds
- Watering can or system
- Gardening tools (spade, trowel)

Step 1: Choose Your Location and Design
Select a sunny spot. A diameter of about 5-6 feet is ideal. Consider the garden’s orientation; the north side will receive less sun, while the south side will be sunnier.
Step 2: Construct the Spiral Foundation
Begin at the center, using stones or bricks to create your spiral. Gradually increase the height to form a slope.
Step 3: Fill with Soil and Compost
Use a mix of garden soil and compost for nutrient-rich planting beds. Pack the soil to prevent sinking.
Step 4: Plant Your Herbs Strategically
- Top of the Spiral (South-facing side): Plant sun-loving and drought-resistant herbs like Rosemary, Thyme, and Oregano. They’ll thrive in the warmth and excellent drainage this position offers.
- Middle of the Spiral: Ideal for herbs that require moderate sun and moisture, such as Parsley, Chives, and Cilantro.
- Bottom of the Spiral (North-facing side): Perfect for herbs that prefer less sun and more moisture. Mint, Lemon Balm, and Tarragon will prosper here.
Step 5: Mulch and Water
Mulch helps retain moisture and suppress weeds. Water thoroughly, especially during the establishment phase and in dry conditions.
Step 6: Regular Maintenance
Harvest herbs regularly to encourage new growth. Monitor soil health and watch for pests or diseases.
Your spiral herb garden is not just a means to grow culinary delights; it’s a living work of art, harmoniously blending functionality with aesthetic appeal. By thoughtfully selecting herbs and considering their placement in relation to sunlight and moisture, you create not just a garden, but a thriving ecosystem.
Enjoy the journey of nurturing your spiral herb garden, a spiral of life that offers beauty, flavor, and the joys of gardening in harmony with nature.